As a Presidential Pools & Spas customer, you’ll never be in the dark about what’s going on in your backyard. By providing regular communications throughout every phase, we keep you informed about what’s to come – including profiles and photos of the Presidential employees who will be visiting your home. Please take a few minutes to familiarize yourself with the stages of the pool construction process below.
Step 1 - Sod Scrape & Layout
Once you’ve met with your designer and are set to build your new Presidential Pool, the first step in the pool building process is the sod scrape and layout! We’ll come out and frame your pool using wood and string - you’ll start to see the size, shape and location of your new swimming pool! The wood shows our next crew where they are digging and also helps set the initial elevation for your new pool.
Step 2 - Excavation
The excavation step is an exciting and fun process - this is where we bring out the machines! You’ll see our trained and professional team dig your pool and shape your future backyard oasis. Afterwards, you’ll have a better understanding and vision of what the pool is going to look like!
Step 3 - Steel
The steel process is one of the most important parts of your pool as it forms the structural integrity and foundation for your new swimming pool. Watch as our team bends, ties and forms your new pool with rebar. We will also place your main drains, insert pipes for future bubblers or other water features and make sure your depth and profile are on point before the gunite step.
Step 4 - Gunite
Now it’s time to see the shell of your new swimming pool! Invite your friends and family to watch as our master shapers go to work shooting concrete (gunite) and form your new pool shell. The experience and precision needed to do their job is incredible - just watch as they make sure every measurement is perfect and your new pool is ready to go! Sunshelfs, steps, swimouts, raised areas, features and more will all start to be seen during this part of the process!
We’re ripping off the layout boards, filling in the voids from the dig and making your backyard flat again! During this step, we will start to set the elevation for your future deck and clean up your backyard for the plumbers to take over!
Step 6 - Plumbing
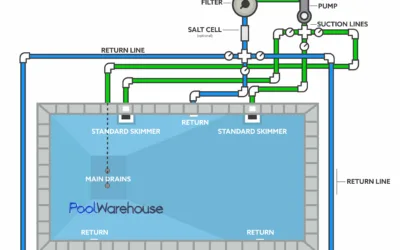
Plumbing is like the arteries of your new swimming pool - it brings the water to and from your pool and ensures you have enough movement for all your water features and spa jets too! We will install your piping for circulation, bubblers, water features, spa jets and more! We will also be setting your equipment so when the electrician arrives, everything is ready to go!
The tile installers are craftsmen like no other - perfection is key! Watch how they install every piece with precision and take their time ensuring each and every piece is exactly where it needs to go. Once the tile step is complete, you’ll see your pool design really start to come to life!
Step 8 - Electric
Hooking up your equipment to the power source requires a licensed electrician to perform their craft. They will ensure each and every piece of equipment is capable and able to provide you with hours of swimming with no issues - they hook up your lights, pumps, heaters, features and automation all in one day!
The deck and coping stage is a ton of fun - now you have your new pool deck to relax on… the only thing missing is water! Sit back and enjoy envisioning where you want each piece of furniture and where your new favorite relaxing spot is going to be! Our skilled deck crew will pitch the deck for proper drainage, build steps, install deck drains and more! If you have a screen enclosure going up, we’ll pour your footers right before this stage so the deck crew is ready!
Step 10- Screen
Time to keep the bugs out and keep your pool clean! We will install your screen so your backyard can now become an extension of your house! Keep the doors open and the breeze flow - we’re almost ready to start swimming! We’ll call in your safety inspection after this step and prep your pool for plaster!
Step 11 - Interior Finish
We’re almost at the finish line - during this step, we’re going to apply the finish that you chose with your designer to the interior of your pool. Watch how these incredible crasftsmen apply your pool finish to every nook and cranny! Once it has dried, they will return to acid wash the finish, helping expose the pebbles and allowing us to drop the hose in to start filling your new swimming pool!
Step 12 - Fire Up
The fire up process is amazing - our technicians will come by, get the pumps running and test the equipment. We will also start adding the first dosages of chemicals to ensure your pool finish cures correctly and gets you ready for “swim time”! The technician will return regularly for the first 30 days to make sure your pool is crystal clear and ready to enjoy! Don’t be alarmed if the pool color is green at the beginning as it takes a few days for the chemicals to start to work their magic!